


Props is a key concept when it comes to develop with React. In this article, we will firstly try to define what is it. Then, we will learn how to pass and access props by creating custom React Native components and finally we will learn how to use PropTypes to validate data received as props.
What is Props ?
Props is short for properties. It's an object used to pass data or information from parent component to child component. Props are read-only and can not be modified in the component receiving it.
<Text numberOfLines={1}></Text>
The snippet above shows a Text component with his properties numberOfLines with 1 as value.
<CountryList list={data} />
In this custom component called CountryList we are passing a prop called list and the value of this prop is data
When building with RN, you have to think in React. The React-way is to break down your User Interface into smalls components. These components will receive data from the parent component through props. These data could have various types or formats : number, string, array, object, functions, React component etc...
Write reusable codes and components is one of the best practices as a developer. Some of the major advantages of the reusability are :
- Reduce development time
- Quickly launch new projects.
- Reduce development and maintenance costs.
- Increase productivity.
Now, let's try to access this props.
Passing and Accessing Props
We will build this small application that displays a list of African countries and the number of their trophies.

And we will use these data.
export default data = [
    {
      id : 1,
      name : "Egypt",
      trophies : 7
    },
    {
      id : 2,
      name : "Cameroon",
      trophies : 5
    },
    {
      id : 3,
      name : "Ghana",
      trophies : 4
    },
    {
      id : 4,
      name : "Nigeria",
      trophies : 3
    },
    {
      id : 5,
      name : "Ivory Coast",
      trophies : 2
    }
];
Remember to think in React
Let's try to break down our UI into components !
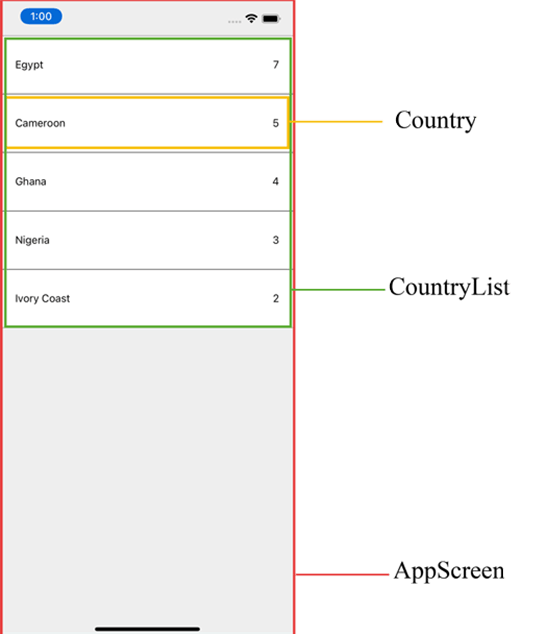
Then we have 3 components :
- App component
- CountryList component
- Country component
App.tsx
import React from 'react';
import {SafeAreaView} from 'react-native';
import data from './src/countries';
import CountryList from './src/CountryList';


const App = () => {
  return (
    <SafeAreaView style={{flex : 1, backgroundColor : '#EEE'}}>
      <CountryList list={data} />
    </SafeAreaView>
  );
};

export default App;
The CountryList component receives here a prop called list that contains data.
CountryList.tsx
import React from "react";
import {View} from 'react-native';
import Country from "./Country";

const CountryList = ({list}) => {
    return (
        <View>
            {
                list.map((item, index) => {
                    return(
                        <Country key={index} country={item} />
                    )
                })
            }
        </View>
    )
}

export default CountryList;
Here we are using a detailed representation of Props.
We could also define the component like this const CountryList = (props) => {} and access to properties like this props.list or const {list} = props.
Keep your eyes on the prop key (...key={index}...) mentioned in the code snipped above. It could disappear 😏.
Country.tsx
import React from "react";
import {View, Text, StyleSheet} from 'react-native';

const Country = ({country}) => {
    return (
        <View>
            <View style={styles.item}>
                <Text>{country.name}</Text>
                <Text>{country.trophies}</Text>
            </View>
        </View>
    )
}


const styles = StyleSheet.create({
    item : {
        paddingHorizontal : 20,
        paddingVertical : 30,
        flexDirection : 'row',
        justifyContent : 'space-between',
        borderWidth : 0.2,
        backgroundColor : '#FFF'
    }
})

export default Country;
You are probably asking yourself, where is the prop key ? This prop is a default React Native prop you should use when you map a list with a component. If not, you will receive a warning. It's also important to notice that, do not use this, causes a performance issue when rendering the list.
Okay ! Now, everything looks correct.
Let's go a step further. We will make each country item pressable, change the apparence of the selected one and display under the list the name of the country selected.
App.tsx
const App = () => {

  const [winner, setWinner] = React.useState(null);

  return (
    <SafeAreaView style={{flex : 1, backgroundColor : '#EEE'}}>
      <Text style={{fontSize : 18, textAlign : 'center', paddingVertical : 20}}>
        Choose the winner of the next CAN tournament
      </Text>
      <CountryList list={data}  select={setWinner} winner={winner} />

      {winner &&
        <Text style={{fontSize : 18, textAlign : 'center', paddingVertical : 20}}>
          {winner.name} will win the tournament
        </Text>
      }

    </SafeAreaView>
  );
};

export default App;
Now our CountryList receives an array, a function and an object.
We could have also passed the function props like this select={(data) => setWinner(data)}.
But. knowing that the the function select in CountyList and the function setWinner have the same definition (same number and types of parameters), we can simply do select={setWinner}.
CountryList.tsx
const CountryList = ({list, select, winner}) => {

    // Check if the current item is the selected one/ the winner
    const isWinner = (item) : boolean => {
        if(!winner) return false;
        return winner.id == item.id;
    }

    return (
        <View>
            {
                list.map((item, index) => {
                    return(
                        <Country
                            key={index}
                            country={item}
                            onPress={() => select(item)}
                            isWinner={isWinner(item)}
                        />
                    )
                })
            }
        </View>
    )
}

export default CountryList;
The Result :
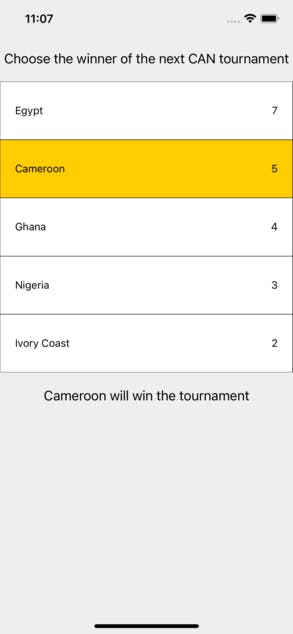
Houray !!! 😎
Now let's bring our components to a senior level by validating data passed through props.
Using PropTypes
What is it ? Why use it ?
PropTypes is an amazing React tool that provides clear assertions as to the type of data a component needs to render properly. It simply helps to define the type of a prop (string, number, boolean, function...) and it's helpful when testing or debugging.
PropTypes is also very useful in agile development as it serves as documentation of component and facilitate coordination between developers working on a same project.
So, it's a great tool and good practice that increase your team productivity. If you are working on complex project, you should absolutely use PropTypes, especially if you are using JavaScript instead of TypeScript.
Let's try it !
The first step is to install the package yarn add prop-types
Now, we should do some changes in our CountryList component
//--- Other imports here
import PropTypes from 'prop-types';

const CountryList = () => {
  ...
}

CountryList.propTypes = {
    list : PropTypes.arrayOf(PropTypes.shape({
        id : PropTypes.number.isRequired,
        name: PropTypes.string.isRequired,
        trophies : PropTypes.number.isRequired
    })).isRequired,
    select : PropTypes.func.isRequired ,
    winner : PropTypes.shape({
        id : PropTypes.number,
        name: PropTypes.string.isRequired,
        trophies : PropTypes.number.isRequired
    })
}

export default CountryList;
What does it mean ?
it means that our component CountryList, to work properly :
- Requires a list property of type array that contains objects with these properties : id of type number, name of type string, trophies of type number and they are all mandatory.
- Requires a select property of type function
- Can optionally receives an object property winner with these properties : id of type number, name of type string, trophies of type number and they are all mandatory except for id.
Now, if you edit our data country list like this :
export default data = [
    {
      id : 1,
      name : "Egypt",
      trophies : "7".  <--- number to string
    },
    {
      id : 2,
      name : "Cameroon",
      trophies : 5
    },
.....
You will receive this warning from React :

Yeah !!!
Let's give the same look to our Country component and introduce the defaultProps concept.
//--- Other imports here
import PropTypes from 'prop-types';


const Country = () => {
  ...
}


Country.propTypes = {
    country : PropTypes.shape({
        id : PropTypes.number,
        name: PropTypes.string.isRequired,
        trophies : PropTypes.number.isRequired
    }).isRequired,
    onPress : PropTypes.func.isRequired,
    isWinner : PropTypes.bool
}

Country.defaultProps = {
    isWinner: false
};

const styles = StyleSheet.create({
       ...
})

export default Country;
defaultProps simply allows to define the default value of a prop. As you can see here, prop isWinner is not required and has false as default value.
Everything looks great 😁
You can learn more about PropTypes here. Maybe I will make a post dedicated to PropTypes soon.
Wow !! You have come this far !!!!!!!! 🥳
Now, you know how understanding how props works can help you to write a clean and trusted code, and increase your productivity.
In our exemple, we used a detailed format of Props. It can be also used like this :
const Country = (props) => {
    return (
        <View>
            <View style={styles.item}>
                <Text>{props.country.name}</Text>
                <Text>{props.country.trophies}</Text>
            </View>
        </View>
    )
}
Or
const Country = (props) => {
    const {country, isWinner} = props;
    return (
        <View>
            <View style={styles.item}>
                <Text>{country.name}</Text>
                <Text>{country.trophies}</Text>
            </View>
        </View>
    )
}
I hope you find this post helpful. Feel free to leave a message in. comments.